TIPS, INFORMATION & INSTRUCTIONS
for our Water Saving Sprinklers & Parts
Part 1
TIPS, INFORMATION & INSTRUCTIONS
FOR LITTLEVALVE SPRINKLER PARTS


|
1) Nozzle screw atop sprinkler head should be left in the full “Open” position. All on-off and flow control is done through the LittleValve. Keys to operate the Little-Valve are provided at no charge. We do recommend that you purchase our AW7187 tool for more leverage. 2) Do NOT crank down on the LittleValve screw; this may 3) Never use the LittleValve key or Allen wrench as a 4) Except for Drip and Micro-Spray application, for maximum water efficiency, use only 15’ to 17’ nozzles and sidestrips. 15’ nozzles can be reduced down to a 6’ radius without closing down nor distorting the spray. NOTE: Refer to the Drip/Micro-Spray tab for tips, nozzles to use and calculations for Little Valve Drip and Micro-Spray. 5) Side strip nozzles are greatly enhanced with the control 6) When flushing sprinklers with LittleValve parts or fittings, remember: you control the amount of water that is allowed to exit the head. Do not waste water. You can flush with just a couple of cups of water, not the gallons you used to use. 7) With male-threaded sprinkler nozzles, (Toro, etc.) remove the little snap-on spacer that affixes to the bottom of the nozzle. Some of these are called pressure compensating devices. Since you control all flow with the LittleValve and each LittleValve product is a pressure-regulating unit, you no longer need this part. 8) For drip application on pop-up sprinklers: To water two plants at the same time, use 5-foot center strip nozzles – (5 CST-B.) Also, stream bubblers provide excellent low-flow, water-saving options. To water one plant, we make a customized 5′ center strip with one hole plugged up that can |
9) On pop-up riser replacement stems, occasional leaking may occur around the LittleValve screw. If the leakage is insignificant and confined to running down the riser stem, we do not reject the part. 10) Pop-up riser replacements for Hunter SRS, Nelson and Weathermatic, also come with a custom ratchet ring. 11) With all Toro, Orbit, Hunter Pro-Sprays and Hit 6” (Model no. 900) no ratchet ring is provided. Use the ring that comes with the head. NOTE: Hunter 6” and 12” stems use a 2-part ring. We supply the black ring; you use the white ring that comes with the sprinkler. 12) LittleValve pop-up riser stem replacements are shipped in the closed position. When changing out replacement stems, you may wish to discard flush caps. After flushing each head, close LittleValve to insert filter screen and attach nozzle. Then keep it closed to conserve water and keep your jobs drier. We suggest that you not make your final adjustments until after planting is completed. NOTE: LittleValve replacement stems do not need flush caps. 13) Since LittleValve pop-up riser stems stay in the ‘UP’ position with or without the nozzle on, heading up and nozzling up your jobs can be done by just one person and with the RC valve opened all the way. 14) When reducing the spray radius to less than 6 feet, we strongly urge you to insert an LVA filter screen under the LittleValve with all pop-up heads but use any manufacturer’s filter screen under LittleValve shrub adapters, couplings and riser extenders. In pop-up stems, push LVA screen, tail first into bottom of stem until it holds in place. With shrub adapters and other fittings, insert filter screen into top of schedule 80 or cutoff riser pipe, then thread on LittleValve part. 15) Pressure regulation or pressure compensation is not necessary with LittleValve sprinklers or parts. Therefore, pressure-regulating stems, PC Screens and PCD’s are eliminated. Pressure-regulating valves installed to reduce misting are generally not needed either. 16) Pop-up riser replacements for all Rain Bird 1800 models and 4” & 12” Hit 900 models come with a custom ratchet ring that replaces the original ring. NOTE: Ratchet Ring for Rain Bird 4” and 12” is different than the 6” Rain Bird ring. 17) All 3 Rain Bird replacement stems can be purchased with check valves factory-installed. |
Part 2
TIPS, INFORMATION & INSTRUCTIONS
FOR LITTLE TUFFY POP-UP SPRINKLERS
The World’s Most Efficient Pop-up Sprinkler Head
|
1) The little screws on top of your nozzles should be left in the full “Open” position. All on-off and flow control is done through the LittleValve. Keys to operate the LittleValve are provided at no charge. We do recommend that you purchase our AW7187 tool for more leverage. 2) NOTE: Little Tuffys are sensitive to fine, silty soil. They come with bio-degradable corks to keep soil particles out of the wiper seal area. Keep corks in place during installation, turn on water and let corks be knocked off. Be sure your installation is relatively clean and make sure the top of the Little Tuffy is level or slightly above the surrounding soil level. If any sprinklers do not retract after turning off the water, manually pull the stems up and down a few times to dislodge small particles from the wiper seal area. In most cases, this should end any ‘sticking-up’ problems providing years of trouble-free operation. In rare cases, removal and cleaning of the stem and wiper seal and flushing of the body may be required. 3) Do not crank down on the LittleValve screw; this may damage the part. LittleValves shut down between 96% to 99%. Do not expect 100% shut-off. The objectives are to remove nozzles without shutting down the whole system and control distance of the spray. 4) Never use the LittleValve key or Allen wrench as a leverage tool to rotate the pop-up stem. That can damage the LittleValve Allen screw. Rotate the stem with a pair of small blue channel locks. 5) For maximum water efficiency, use only 15’ or 17’ fixed-spray nozzles. These can be reduced down to a 6’ radius without closing down nor distorting the spray. For micro- spray application – 2 1/2’ to 6’, use Rain Bird’s 8-foot FLAT nozzle, not the regular 8-foot radius nozzle, or Toro’s FLAT. 6) Side strip nozzles are greatly enhanced with the control you have over them with LittleValves. Side strips and center strips can now be taken down to 2’ – 3’ left and right. To reduce below 5 -6 feet left/right, we will recommend Hunter’s SS530 side strip to ensure water comes out in front of the sprinkler at all times. 7) For drip application on Pop-up sprinklers: To water two plants at the same time, use 5-foot center strip nozzles, (5 CST-B.) Also, stream bubblers provide excellent low-flow, water-saving options. To water one plant, we make a customized 5′ center strip with one hole plugged up that can be brought down to about 24 inches. |
8) Little Tuffys use only Female nozzles. Other nozzles that work effectively with Little Tuffys are 9’ X 16’ side strips and left and right corner strips. Use any size VAN you want. If you get misting, increase the size of the VAN. 9) The LittleValves in Little Tuffy sprinklers are shipped in the closed position. After flushing each head, close the LittleValve to insert filter screen and attach nozzle. Then keep it closed to conserve water and keep your jobs drier. We suggest you make final adjustments after planting is completed. 10) Little Tuffys do not need flush caps as the stems stay in the ‘UP’ position with or without the nozzle on. Nozzling up your sprinklers can be done by just one person and with the irrigation valve opened all the way. You can leave the corks on the ground or bury them with the sprinkler as they will disintegrate. 11) Pressure regulation is never necessary with Little Tuffy sprinklers or with any LittleValve parts, because every LittleValve product is a pressure-regulating sprinkler or sprinkler part. Therefore, pressure-regulating stems, PC Screens and PCD’s are eliminated. Pressure-regulating valves installed to reduce misting are not needed either. 12) Little Tuffy wiper seals are easily replaceable. They can be purchased inexpensively in bags of 5 when needed. Caps are also replaceable. Little Tuffys can be purchased with purple caps for use with reclaimed water. 13) When flushing Little Tuffy sprinklers, remember: you control the amount of water that is allowed to exit the head. Do not waste water. You can flush with just a couple cups of water, not the gallons you have been using in the past. 14) Occasional leaking may occur around the Little-Valve screw on the side of the pop-up riser stem. If the leakage is insignificant and confined to running down the riser stem, we do not reject the sprinkler. 15) When reducing the spray radius to less than 6 feet, we strongly urge you to insert an LVA (Low Volume Application) filter screen UNDER the LittleValve in your Little Tuffy sprinkler to protect the LittleValve area from dirt and debris. |
Part 3
TIPS, INFORMATION & INSTRUCTIONS
FOR PRECISION ROTATING NOZZLES (PRN)
 |
 |
Coupled with LittleValve sprinkler parts, the very best
Water Saving Sprinkler nozzle that has ever been created
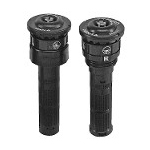
1) Installation of your PRN. The top or crown of the nozzle is approximately ½ inch in diameter and is divided into 3 sections. (The rest of the nozzle is the inseparable filter screen.) The bottom section of that crown is the part that you use to tighten the nozzle onto the sprinkler. For female styles, that bottom section has plenty of space to grip with but the male style PRN only has a 1/16″ area with which to grip. We strongly urge you to use a small, blue channel locks to grip the bottom section of the nozzle crown and to tighten it onto the sprinkler part or the pop-up stem. Keep the channel locks off of and above the pop-up stem and do not grab onto or into the middle section of the crown as that is the area you use to adjust the arc, which are the left-right settings. Be careful not to use too much force tightening the nozzle onto the stem. Just tighten it to the point where you feel it is snugly attached to the sprinkler part or stem and you are unable to remove the PRN with your fingers. The idea is to keep the nozzle from coming off the stem whenever you have to adjust the arc to the left. NOTE: Also be sure that the entire pop-up sprinkler is firmly tightened below the ground onto riser and into fittings.
2) Adjustable Model (45° – 270°). Use the black adjustable arc wrench that comes with your Adjustable PRNs to make your arc adjustments. Insert the 2 arms of the adjustment wrench around the middle section of the crown where is located an ‘L’ and 3 little circular icons. Just use a light touch; don’t muscle it. The L indicates the left edge of your arc.
3) The left side of the arc is the adjustable side. The right side is fixed and cannot be adjusted. Therefore, to begin, set the right side streams first and adjust the left side streams to fit the area being watered. Turning the wrench to the right (clockwise) shortens the arc, whereas turning the wrench to the left (counter-clockwise) increases the arc. Note that the (radius) distance of the streams decrease when the arc width is increased whereas when the arc width is decreased, the stream distances increase.
4) In every complete rotation of the arc pattern, there are 2 longer streams. (Hint: The longest stream comes out from under the ‘R’ in the word “TORO” inscribed on the top of the PRN.) Those 2 longer streams arc or extend out a little more to the left than the smaller ones and do the same by arcing out a little more to the right than the smaller streams. Adjust your side distances to those 2 streams and the smaller streams will take care of themselves.
5) As with all LittleValve parts, the radius ‘throw’ distance is controlled by the LittleValve screw on the side of the part or the pop-up riser stem; you never use the little stainless steel screw atop the nozzle for distance adjustment. Every order of LittleValve parts, Little Tuffy pop-ups or Toro 570-PS pop-ups includes several little zinc-coated keys. Additionally, we strongly urge you to buy one of the red-handled LittleValve Allen wrenches (AW7187) for extra leverage, which at times becomes necessary. Check under LittleValve Tools in the Catalogue tab of the website or go the LittleValve tools sub-page under the “Buy Products Here” tab to see the AW7187.
6) When adjusting PRNs, you’ll find that it’s easier and faster if you leave your black arc adjustment wrench in place and the same with the little key. When completely satisfied with your arc patterns and distances, then remove both tools and go to the next sprinkler.
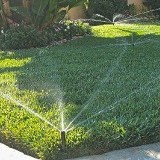
PLEASE NOTE: Initially it will take some patience to achieve the utmost in precision watering with little or no water hitting the surrounding sidewalks, buildings and streets. But having that patience will provide you with years of efficient watering with the least maintenance of any sprinkler on the market. Once the arc and distance patterns are established, PRNs rarely go out of adjustment. Please also note, that when using PRNs in lawn areas, you will get some water onto adjacent sidewalks from the 3 or 4 large streams in order to get coverage from the smaller streams onto the grass right next to the sidewalk. In shrub areas, you should have no water hitting the sidewalks, driveways, etc.
7) Full Circle Models. No arc adjustment tool comes with Full Circle models as that pattern is fixed. The only adjustment required with Full Circle models is the radius distance, which you do via the LittleValve and the zinc-coated key. Remember, the maximum radius distance from a full circle model might be a little less than from an adjustable model.
8) When installing PRNs into the sprinkler part or onto a pop-up sprinkler stem, you must flush the sprinkler head you are working on. This actually is or should be a standard practice with any nozzle. Even if you have flushed the lines during installation, you must flush each individual sprinkler when you install PRNs. The key words when installing PRNs are flushing, flushing and flushing. When installing PRNs, the more times you turn the little cap at the top of the PRN with your fingers – clockwise and counter-clockwise – the better the PRN operates.
9) TROUBLE-SHOOTING. On occasion, a PRN after installation will not rotate. When that happens a little trouble-shooting is necessary. There are a few things you can do to get the PRN to start and continue rotating. The first is to make sure that you re-flush the sprinkler head where you are having the problem. Don’t forget to snug PRN onto pop-up stem with channel locks when re-installing after the flushing operation. Second, with your fingers, turn (or rotate) the top section of the nozzle – the part that looks like a little cap. Turn it to the right 3 times then turn it to the left 3 times. Then do that again and a 3rd time. If that does not work or it does work but then stops rotating again, then take your black, arc adjustment tool and open up the arc radius all the way to the left (to 270°) and then all the way to the right (to 45°) and do this several times, as well. Lastly, at the back end of your black adjustment tool, the tip fits into the little screw in the center of the cap of the PRN. (That is the distance adjusting part of the tool that you never need when you have LittleValve parts.) Insert the tip into the stainless steel adjusting screw and turn it 3 times all the way to the left and then 3 times all the way to the right. When doing that, be sure to hold the cap with your other hand so the cap doesn’t move. When finishing that, be sure the last turn is towards the + mark so that the PRN is left in the wide-open position.
Don’t be afraid to do the above suggestions a few times. Sometimes, if you do the above suggestions just once, the problem is still there but most often, if you do them a few times, the problem ends up going away especially when you include a lot of flushing. Also, taking off the nozzle from the sprinkler part and shaking it in your hand can also help to dislodge whatever is keeping the nozzle from rotating. When you do that, you should hear a slight rattling sound.
If after doing all that a few times and the nozzle still does not rotate or does rotate and then stops again after a few moments, then you may have a defective part, at which time, please contact us so we can make immediate arrangements to get you a new PRN replacement.
Clogged nozzles: When a sprinkler upstream (or before the sprinkler) you are working on gets broken, oftentimes the sprinklers downstream get clogged up because dirt, sand and debris enter the water systems through the broken lines. Also, certain water districts have water that contains enough particles to clog up sprinklers and filter screens. Re-claimed water presents nozzle-clogging problems. If you become aware of a noticeable radius reduction in a spray pattern, the chances are the nozzle has gotten clogged up with fine, silty soil. When the radius reduction appears, the first thing to do is to close down the LittleValve, then remove the PRN nozzle. Look over the attached filter screen carefully for evidence of dirt and/or sand. Open the LittleValve rather strongly to flush the lines and the sprinkler head, then use that flushing water to thoroughly spray directly at the screen to cleanse it of soil particles.
10) The PRN, like any other rotary nozzle is much more delicate than a fixed spray nozzle. It’s a fine piece of equipment that does a far more superior watering job than any spray nozzle can. Consequently, it does not like being run over by the wheels of a lawn mower or being beaten up by a string trimmer. After installing PRNs, we suggest that you advise your gardeners to do their work around the PRNs accordingly and where PRNs are next to sidewalks, the gardeners MUST straddle the sidewalk-lawn boundary with the lawnmower wheels. The fact of the matter is that NO sprinkler nozzle can take a lot of direct hits from lawnmower wheels. Additionally, when nozzles get constantly hit by lawnmower wheels they start losing their straight up and down vertical posture, which then adversely impacts the watering pattern so much that dry spots start appearing in your lawn.
Part 4
PRN Technical Information
Table of Contents
1. Specifications for Precision Rotating Nozzles (PRN)
2. Side Strip Nozzles to mix with PRNs
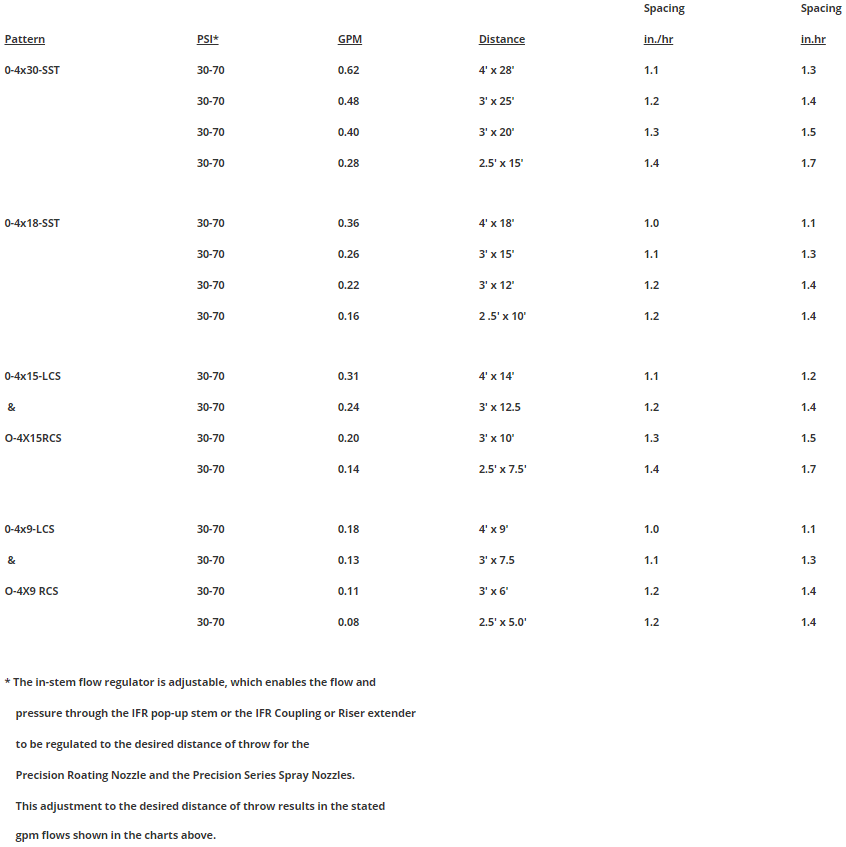
1. Specifications for Precision Rotating Nozzles (PRN)
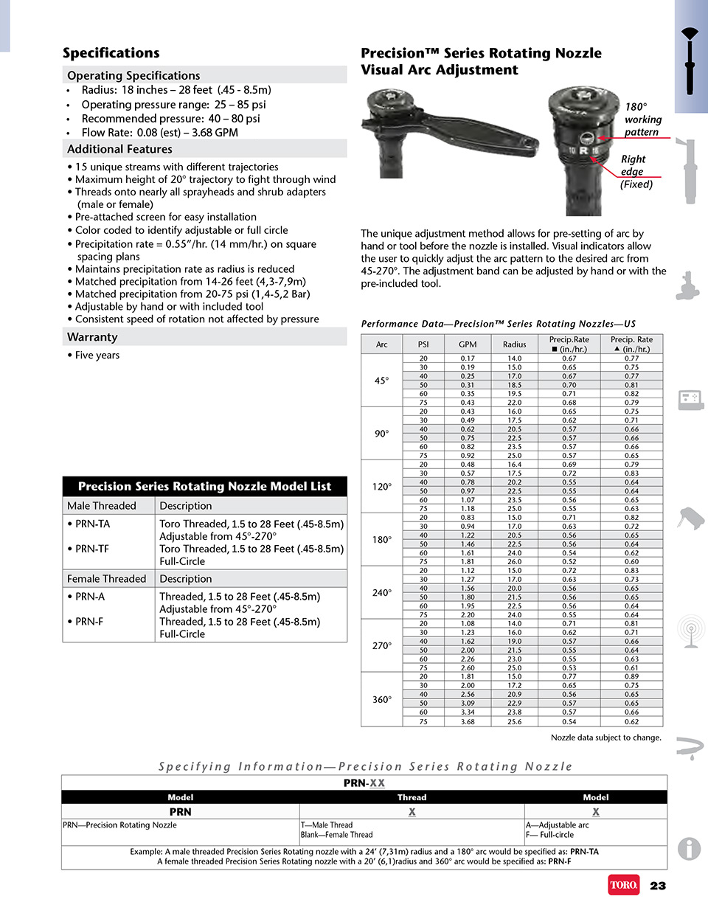
Performance Data for
Precision Rotating Nozzles
4 Feet through 14 feet Radius

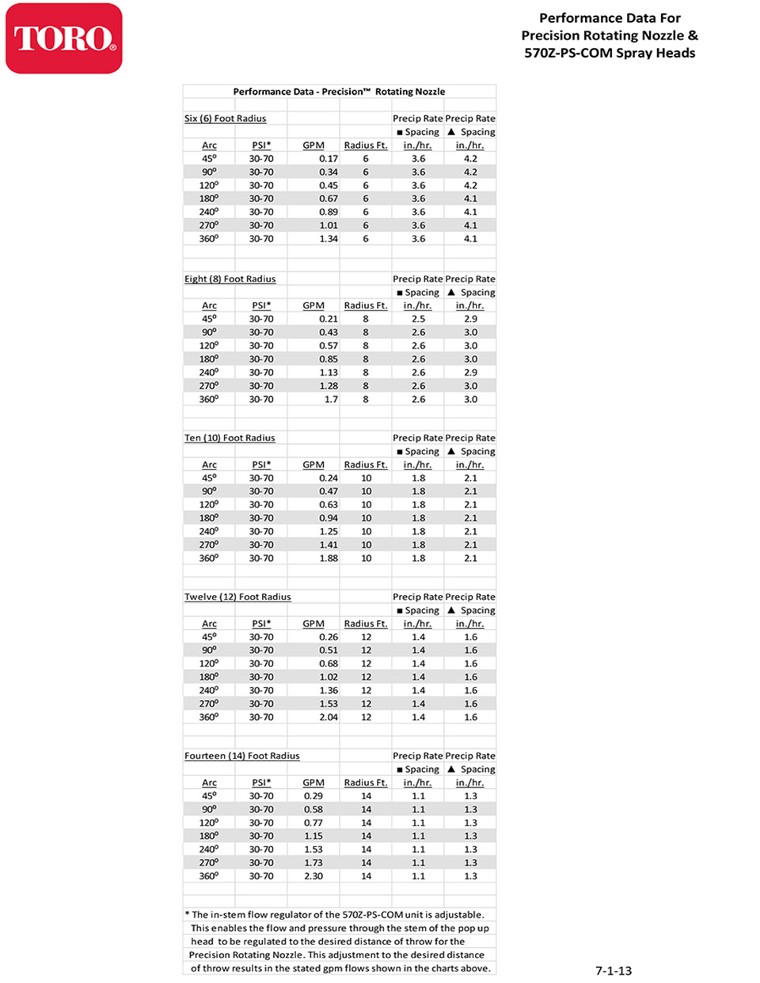
2. Reduced Radius Performance for Precision Series (PSN)
Side Strip Nozzles.
Part 5
PREFERRED NOZZLE INFORMATION
NOTE: A most important part of achieving water conservation with maximum water savings and unmatched flexibility from LittleValve sprinkler products with In-stem Flow Regulation (IFR) is knowing what nozzles to use for the particular situation you come across. This page should help.
Therefore, the trick to LittleValves is knowing what nozzles to use.
PREFERRED NOZZLES RECOMMENDED FOR USE
WITH LITTLEVALVE WATER SAVING SPRINKLER PARTS AND LITTLE TUFFY POP-UP SPRINKLERS
A. Fixed Sprays & VANs (Variable Arc Nozzles – adjustables): With fixed spray nozzles, we recommend using only 15’ nozzles down to 6’, and Flat-spray nozzles from 6’ down to 2′. With VANs, use any size you want. However, if you should encounter misting and fogging, then you should upsize to a larger VAN nozzle until the misting has gone away.
B. Side Strip Nozzles: Only with LittleValves can side strip nozzles be brought down to 3’ to 4’ left and right. Normally the 15’ left/right spray of side strip nozzles cannot be controlled. In most situations, we must recommend the SS530 nozzle made by Hunter as it assures water will spray out evenly from the front of the nozzle at any left/right distance setting. For ends of planters, use corner strips – LCS515 and RCS515. 9’ X 18’ side strips from all manufacturers are also very useful when used with LittleValve parts. For watering side strips at a left/right distance in excess of 9 -10 feet AND when using Toro’s Precision Rotating Nozzle (PRNs) on other sprinklers in the same valve system, we recommend using Toro’s Precision SPRAY Nozzle (PSN) 4 X 30 side strip as its flow rates at those distances are more compatible with the flow rates of the PRN.
C. LittleValve Drip: For pop-up sprinklers, Rain Bird’s 18’ VAN (adjustable nozzle) can be brought down to as low as a 15” drip steam dispensing water at the rate of approximately 9 gallons per hour. (GPH) For above-ground stationary sprinklers use Valvette System’s BS50, which threads onto our 1/2″ Riser Extender (RX550) or onto a 1/2″ riser nipple that is connected onto our 1/2″ Coupling (CP050). Then with the LittleValve, the throw distance can be brought down to as low as 6″ dispensing water at the rate of 2 GPH. [See the BS50 pictures in the “Drip & Micro-Spray Information” tab.] To water 2 plants at the same time, use 5CST-B nozzles. Significant water savings can also be obtained in shrub or flower beds using 5-foot stream bubblers because they can be reduced down to 9” diameter using about ¼ gpm. Plus, stream bubblers, i.e. 5H-B, work very well in Rose gardens and under established bushes. The 5F-B nozzle is the best for round planter areas or pots 9” or larger. Use the 5Q-B to water trees, which puts water on 2 opposite sides of a tree without hitting the trunk. Learn more in the “Drip & Micro-Spray Information” tab.
D. LittleValve Micro-Spray: Small tight areas especially near buildings are always challenging to the irrigator. Rain Bird’s (8 FLT) and Toro’s Flat-Spray can be so controlled with LittleValves that they are the very best micro-spray sprinklers available today. Rain Bird’s optimum range is from 2½’ to 6’, whereas Toro’s Flat nozzle can be brought down to 2’ but uses slightly more water. Also, use 6’ VANs and Hunter’s SS530 side strips in 3’-4’ areas. LittleValves provide micro-spray application without misting or pressure regulation and is the world’s easiest micro-spray to maintain and service. The average application rate is 15-20 gallons per HOUR.
E. Rotary Nozzles:
1) Toro’s Rotary – PRN (Precision Rotating Nozzle) – Has the largest distance range of all rotaries; can be adjusted from 20′ – 28′ down to 14″ – 18″ with LittleValves. Adjustable Arc range: 45 – 270 degrees. NOTE: Testing has concluded that the PRN easily maintains a radius distance of 1½ feet. Testing commenced on April 5, 2013 and has continued until today.
2) MP Rotators – LittleValves can bring the 3000 model down to about 17 – 18 feet; 2000 models down to 11 – 12 feet. One important help LittleValves give to MP Rotators is that it is much easier to control distances with the LittleValve than it is to play around with the very tiny adjustment screw atop the MP Rotator. Even professionals have problems with that screw. It’s a breeze to adjust distances when you have In-stem Flow Regulators. Adjustable Arc range is 90 – 210 degrees in one model, 210 – 270 degrees in another model.
3) Rain Bird’s rotary nozzles – LittleValves can bring the 17’ – 24’ models down to a 4 – 5 foot radius. Adjustable Arc range: 45 – 270 degrees. Rain Bird’s 13’ – 18’ model is never needed, hence is rendered obsolete with LittleValve parts.
F. Precision Spray Nozzles – PSN: Precision Sprays are a fixed-spray nozzle therefore, you should use only 15-footers with LittleValve parts or Little Tuffy pop-ups. You will find that a Precision Spray 15’ nozzle connected to a LittleValve part can easily be brought down to 6’ or 7’ and all misting and over spray eliminated regardless of pressure.
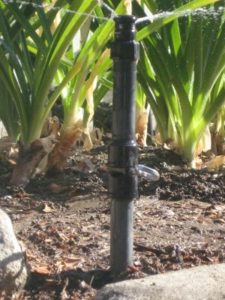
NOTE re shrub adapters – Rotary nozzles and PSNs do not fit into LittleValve shrub adapters, therefore for installing PRNs or PSNs onto shrub adapters in shrub and ground cover areas, connect a LittleValve coupling (CP050) onto the vertical riser coming up out of the ground. Onto the top of the CP050, connect a minimum 2″ nipple. Then connect a conventional shrub adapter, (available in the Stationary LittleValve Parts section,) on top of the nipple to receive the PRN or PSN. Please see the picture below.
Side and Corner Strip Nozzles that can be mixed with PRNs on the same Valve Systems
When combined with LittleValve parts or sprinklers, Precision Rotating Nozzles (PRNs) will – in almost all cases – likely be the only radius nozzle you will ever need if the distance range is anywhere between 14 -18 inches [regardless of pressure] up to 20 – 28 feet [depending on pressure]. However, PRNs do not replace side strips, center strips or corner strip nozzles.
There will be many times in which you as the irrigation specifier, contractor, consultant or even a homeowner, will encounter situations where you will need to incorporate side strip nozzles into the same valve system as your PRN radius nozzles or any other rotating nozzles.
The idea is to always keep flow rates of the different sprinklers on any given valve system as close as possible. The following recommendations are made with that goal in mind.
1. If the left/right side distance the side strip needs to cover is 9 – 10 feet or more on each side, use Toro’s Precision Spray Nozzle (PSN) 4 X 30 side strip or 4 X 15 LCS/RCS corner strips. The flow rate of this nozzle when opened at 7 – 10 feet or more on each side is similar to the flow rate of the PRN. This nozzle typically does not do a good job of watering when taken down less than 7 or 8 feet – left and/or right – even with LittleValves. The PSNs do come in both male and female styles. There is also a 4 X 18 foot model, which allows a little more flexibility for the lower distances.
PSNs are on the rebate list of the Southern California Metropolitan Water District (MWD).
2. If the left/right side distance the nozzle needs to cover is under 5 – 6 feet on each side, use Hunter’s SS530 – a 5 X 30 side strip or LCS/RCS 515 corner strips. The flow rate of this nozzle when opened at 6 or less on each side becomes more similar to the flow rate of the PRN. With LittleValves, this left/right distance can be taken all the way down to 2 – 3 feet left and right and water will always exit out in front of the nozzle, which other side strips just cannot do. Hunter’s side and corner strip nozzle line comes only in female styles.
Unfortunately, Hunter’s side strip nozzles are not on the rebate list of the Southern California Metropolitan Water District (MWD).
After years of working with LittleValve products, we came up with the above recommendations. We have proven to ourselves over and over that these combinations work best and even though there might not be matched precipitation between all the nozzles, the end result is significant water savings with a great-looking landscape with little or no over spraying, little water lost to misting/ fogging when high pressure exists, and rarely are there pockets of excess water usage ever being detected.
Part 6
Test Data & Water Savings Reports
Section 1: Test Data Reports
Section 2: Water Savings Reports from Conversions
Section 1:
Test Data Reports
Click Links for Test Data Info:
|
|
|
|||
|
|
|
|||
|
|
|
|||
|
|
|
Section 2:
Water Savings Reports
Featuring Results of ‘Before’ and ‘After’ Testing of Existing Sprinkler Systems
Changed out (or Converted) with PRN/LittleValve Combo Sprinklers
Introduction to Sprinkler Head Water Savings Reports
The following Reports below record significant and immediate water-saving results from simple, low cost change-outs of just 2 spray sprinkler parts: the pop-up riser stem and the nozzle. The pop-up stem contains an In-Stem Flow Regulator (IFR) and the nozzles are high-efficiency (H/E). Both parts are on the commercial rebate list of the Metropolitan Water District of Southern California (MWD). The attached reports show that significant flow reductions and concurrent water savings can be achieved immediately. Additional reports will be included as they become available.
Bottom Line Results
Scroll down to view Reports. From those Reports, we have learned that when converting a typical ‘spray’ system to the PRN/LittleValve Combo, the following water savings can generally be anticipated:
TURF AREAS: 30% – 45% savings, 3 seasons a year. SHRUB AREAS: 40% – 55% savings, 4 seasons a year.
The LAX Single Valve Trial shows that when converting lawn areas 26 feet or less in width that are being watered with gear-driven rotors, savings in excess of 60% are achievable.
High Efficiency Nozzles – Preferred Models
Toro® Precision™ Series Rotating Nozzles (PRN) for all ‘Radius’ applications due to its great flexibility:
(1) Arc range of 45° to 270° with its ‘Adjustable’ model, the other model is a fixed full circle pattern; (2) availability in both Male and Female styles allowing use on all plastic sprinklers; (3) very low trajectory, which undercuts even high wind conditions; and (4) when paired with an IFR, has a phenomenal distance range of 18 inches, regardless of pressure, all the way up to 20 – 25 feet, depending on pressure.
For long, narrow planter areas, most professionals use side strip nozzles. When using side strips in the same valve system with rotating nozzles, flow rates must be respected. From full open down to 6 – 7 feet, left/right, only Toro’s Precision Spray Nozzle (PSN) model nos. 4 X 30 SST and 4 X 18 SST as well as its left and right corner strips can be used. The PSN line also comes in male and female styles. When the side strip nozzle is to cover a left/right area of less than 5 – 6 feet, only Hunter’s SS530 can provide proper coverage.
Benefits of Combining Distinct Technologies
Because of all the advantages of the two parts described above, the water savings noted in the reports can be considered an annual reduction in total water use because the recommendation is, in most cases, to leave the station run times unchanged. This is possible because the water passing first through the In-stem Flow Regulator and then into high efficiency nozzles is applied more slowly – reducing or eliminating runoff – and more efficiently – because the water is being applied more evenly and without the over spray and misting that previously characterized the operation of sprinkler systems. For those reasons, dramatic flow reductions are being experienced. And those flow reductions translate into direct water savings – immediately upon completion of a retrofit and even more so when designed around the Combo and installed into new systems.
Testing Protocol
Irrigation water must be separately metered. Reads are taken ‘Before’ and ‘After’ change-outs. Meter reads are notated down to 1/10 of a cubic foot of water. All reads are taken over 3 or 4-minute periods. To provide more specific results as to water usage differences in shrub areas versus turf areas, the average water savings at each site are expressed in several different formats.
Click Links for Individual Reports:
|
|
|
|||
|
|
|
|||
|
|
|